
Jira Automation Rules: How to Create, Configure, and Optimize Them
Sachin Jain
Aug 13, 2026

Introduction
Jira automation can save teams hours of repetitive work. Yet, creating your first automation rule can feel confusing.
The automation builder gives you many triggers, conditions, and actions to choose from. It is not always obvious how these pieces work together.
Once you understand the basic structure, creating a rule becomes much simpler.
A Jira automation rule tells Jira what to do when a specific event occurs. For example, you can automatically assign new bugs, update fields, or notify a team when an issue changes.
This guide shows you how to create a Jira automation rule from scratch. You will also learn how triggers, conditions, and actions work together.
We will cover practical examples you can adapt to your own Jira workflows. We will also look at Rovo AI and how it can help create automation rules using natural language.
What is an Automation Rule in Jira?
A Jira automation rule is a set of instructions that tells Jira what to do automatically when a specific event occurs.
Instead of manually assigning issues, updating fields, or sending notifications, you can let Jira handle these tasks for you.
Atlassian’s newer interface may refer to automation rules as automation flows. (The purpose is the same.)
Instead of a person assigning every new bug or closing every stale ticket by hand, the rule handles it the moment its conditions are met.
Every Jira automation rule follows the same basic structure:
- Trigger: The event that starts the automation.
- Condition: The criteria that determine whether the rule should continue.
- Action: The task Jira performs when the conditions are met.
Think of it as a simple workflow: something happens → Jira checks the criteria → Jira takes action.
Conditions are optional. If you do not add one, Jira performs the action whenever the trigger occurs.
This structure makes Jira automation flexible enough for simple tasks and more complex workflows. Once you understand these three components, creating and troubleshooting automation rules becomes much easier.
Where to Find Automation in Jira
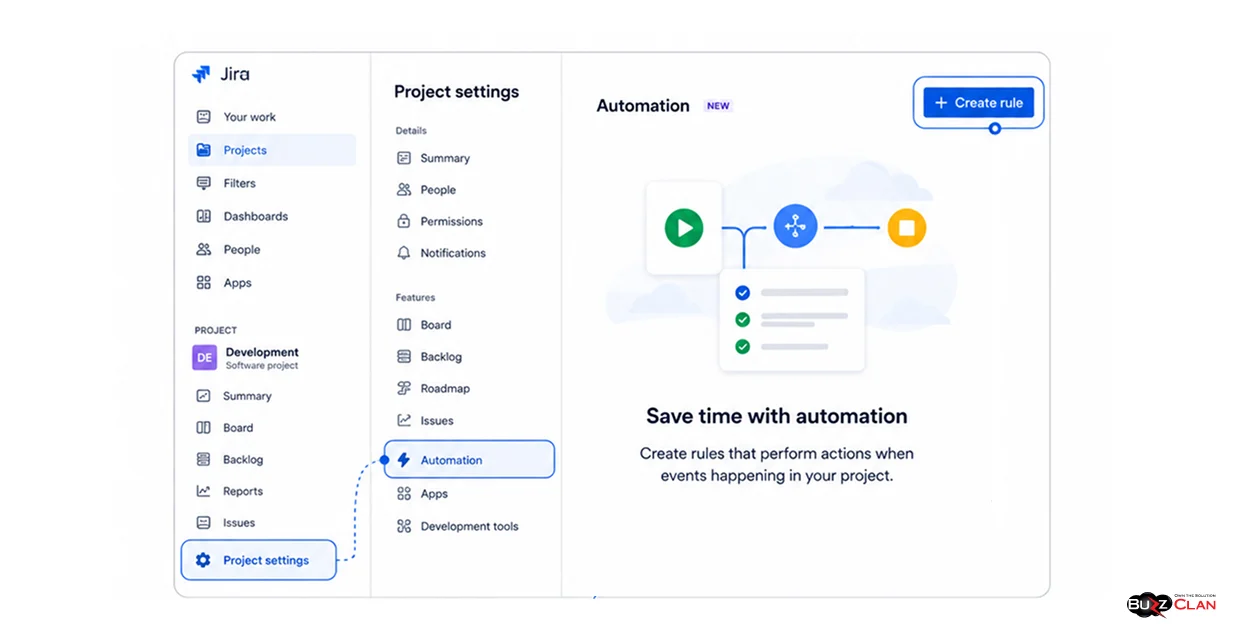
You can access Jira automation directly from your project settings.
Open the Jira project where you want to create the rule. From the sidebar, select Project settings, then choose Automation.
From the Automation page, select Create rule to open the automation builder.
Your permissions determine which automation rules you can create or manage.
Project administrators can create and manage rules for their projects. Rules that span multiple projects or the entire Jira site require broader administrator permissions.
If you are creating your first rule, start with a project-level automation. It is easier to test and understand before applying automation across multiple projects.
Once you have access to the Automation page, you can start building your rule.
How to Build Your First Rule
The rule builder is really just a chain of dropdown menus that follow the same trigger, condition, action pattern you just learned.
Start with a trigger, and the five most common ones are:
- Issue Created: Fires when a new issue is added to the project.
- Issue Transitioned: Fires when an issue moves between statuses.
- Field Value Changed: Fires when a field, such as priority or assignee, is updated.
- Comment Added: Fires whenever someone comments on an issue.
- Scheduled: Fires on a recurring schedule you define.
Next, you can add a condition, though it’s optional. For example, if your trigger is “issue created,” a condition like “only if issue type equals Bug” keeps the rule from firing on every other issue type.
Finally, add an action. The five most common ones are:
- Assign Issue: Hands the issue to a specific person or role.
- Edit Issue Field: Updates a field automatically, like setting priority.
- Transition Issue: Moves the issue to a new status.
- Send Notification: Alerts specific people about the issue.
- Add Comment: Posts an automatic status update.
There’s also a branch rule option, which lets one automation apply to related issues like subtasks. It’s useful once you’re comfortable with the basics, but entirely optional for your first attempt.
Once your pieces are in place, there’s just one step left before the rule actually starts working.
Turning Your Rule On and Testing It
Give the rule a clear, descriptive name first, something like “Auto-assign new bugs to QA lead” rather than a generic label like “Rule 1.”
Give the rule a clear name, review its trigger, conditions, and actions, then select Turn it on.
After it runs, open the automation audit log to check its status and review the details of each step. The audit log keeps automation activity from the past 90 days, so check it soon after testing a new rule.
It shows every time the rule ran and whether it succeeded, making it the first place to check if something seems off.
Building rules manually this way covers most everyday needs, but it’s worth knowing there’s now a quicker path too.
Create Rules by Just Typing (New AI Feature)
As of 2026, Jira’s Rovo AI feature lets you skip the builder entirely for simple rules.
Type a plain request like “assign high-priority bugs to me,” and Rovo interprets it and automatically constructs the full rule, choosing the right trigger and action on its own.
You can still review and adjust the result before turning it on, so nothing activates without your approval.
This doesn’t replace understanding the trigger, condition, and action structure covered earlier, since you’ll still want to know what the AI actually built.
But it’s a genuinely faster way to create straightforward rules once you understand the basics. Seeing a couple of finished examples helps tie all of this together.
Two Rules You Can Copy Right Now
Rule 1: Auto-Assign New Bugs
- Trigger: Issue created
- Condition: Issue type equals Bug
- Action: Assign issue to your QA lead
- Result: Every new bug lands in the right queue without manual assignment.
Rule 2: Auto-Close Stale Tickets
- Permissions: The rule actor may not have permission to perform the action.
- Trigger or conditions: The trigger filter or condition may be excluding the issue.
- Usage or service limits: The site may have reached a monthly allowance or another automation limit.
- Action configuration: A field value, transition, smart value, or integration may be incorrectly configured.
For more starting points, open Jira’s Automation section, select Create flow, and choose Use a template. You can then select a pre-built flow and adjust it for your project.
Even a well-built rule can misbehave occasionally, so it helps to know what usually causes that.
Build Smarter Jira Workflows
Turn repetitive Jira tasks into reliable automation rules. BuzzClan helps you design, configure, and optimize project-level and global automations that save time and keep work moving.
Fixing a Rule That Won’t Run
When a rule does not run as expected, start by checking these common areas.
- Permission Issues: The rule’s actor, meaning the account it runs as, lacks permission for the configured action. Check the actor setting in the rule’s details panel.
- Wrong Conditions: The condition is stricter than intended, quietly blocking the rule. Remove it temporarily to confirm the trigger and action work on their own.
- Hitting A Monthly Limit: Your site has used up its monthly automation allowance, so the rule stops running until the limit resets.
Jira automation limits depend on the product and rule scope. The table below shows the monthly Jira product-level flow-run limits. Global and multi-project automation can have separate execution limits.
| Plan | Rule Runs per Month (Jira Software) |
|---|---|
| Free | 100 |
| Standard | 1,700 |
| Premium | 1,000 rule executions multiplied by the number of users |
| Enterprise | Unlimited |
If your rule runs across multiple projects, check the global and multi-project limits separately. These limits are not always the same as the product-level allowance.
Per Atlassian’s automation usage documentation, these limits reset on the first of every month at 00:00 UTC, and usage is tracked separately for each Jira Cloud product.
To Sum Up
Every Jira automation rule comes down to the same three ideas: something happens, something gets checked, and something gets done automatically.
You build it inside Project Settings under Automation, choose a trigger and action from the common options above, and turn the rule on once it’s clearly named.
If you’d rather skip the manual steps, Rovo AI can now build a working rule from a plain-language request.
And if a rule ever stops firing, the fix is almost always a permission setting, a strict condition, or a monthly limit that’s been reached.
Get Help With Your Jira Automation
Not sure why a rule is failing or how to automate a complex workflow? Talk to our team about permissions, conditions, integrations, and ongoing Jira automation support.
Frequently Asked Questions
A set of instructions that tells Jira to perform an action automatically when a specific event happens, built from a trigger, an optional condition, and an action.
Jira’s Free plan limits how many times automation rules can run each month. The number of rules you can create may be governed by separate product or service limits, so check the current plan documentation before relying on this figure.
Yes, the builder works entirely through dropdown menus, and Rovo AI can now build rules from a plain-language request instead.
Project-level rules run only within one project and need project admin access. Global rules span multiple projects or the whole site and require site administrator access.
Usually a permissions issue with the rule’s actor, an overly strict condition, or the site’s monthly automation limit being reached.
The auto-assign bugs rule, since it uses just one condition and one action, making it simple to test and understand.
Yes, Jira’s built-in template library includes many more for scenarios like SLA tracking, sprint automation, and cross-project notifications.
BuzzClan’s Atlassian services team can help organizations assess Jira workflows and plan automation for project-level, multi-project, and broader Jira environments. The exact support depends on your workflow, permissions, integrations, and requirements.
BuzzClan can help organizations review automation performance, troubleshoot failed rules, and improve workflows as requirements change. Confirm the available support model with the BuzzClan team.
It can trigger actions in Confluence and connect to external systems through webhooks, increasingly supported by the Atlassian Teamwork Graph, which links data across Jira, Confluence, and 75-plus third-party tools.
Auto-assigning bugs by type, closing stale tickets on a schedule, sending SLA breach warnings, and syncing updates across linked issues.

Get In Touch